What is RAID?
RAID Levels - How the drives are organized
How to determine your RAID level
RAID 0 - Disk Striping
RAID 1 - Disk Mirroring
RAID 4 - Disk Striping with Parity on a Dedicated Drive
RAID 5 - Disk Striping with Distributed Parity
RAID 6 - Disk Striping with Dual Parity accross devices
RAID 10 - Combination of RAID 0 & RAID 1
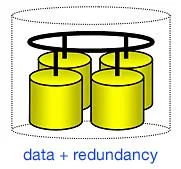
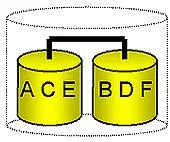

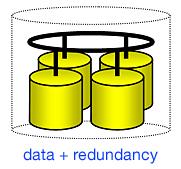
RAID (Redundant Array of Independent Disks) refers to multiple independent hard drives (the yellow pots in the picture) combined to form one large logical array (dashed pot). Data is stored on this array of disks with additional redundancy information. The redundancy information may be either the data itself (mirroring), or parity information calculated out of several data blocks (RAID 4, or RAID 5). With RAID in place, the operating system (Windows*, NetWare*, or Unix) no longer deals with individual drives, but instead with the entire disk array as one logical drive.
The major objectives of RAID are to improve data availability and security. RAID prevents downtime in the event of a hard disk failure, however it cannot recover data that has been deleted by the user or destroyed by a major event such as theft or a fire. Because of this, it is imperative to routinely back up your data to secure your system from these problems after a RAID system is installed.
There are two ways to implement a RAID solution. A hardware RAID controller is intelligent and processes all RAID information itself. With this kind of system installed, all control of the RAID array is offloaded from the host computer and is controlled entirely by the RAID controller. An alternative is to implement RAID with a simple host adapter and RAID driver. In this type of system, the driver is integrated into the operating system, i.e. Windows* NT. In this case, the performance of the RAID system is completely dependent on the processing load placed on the host CPU, which can potentially become a problem during the array reconstruction phase following a disk failure.
Some things to look for in a hardware RAID controller are: ease of installation and maintenance, the capabilities of the management software and the manufacturer's experience in developing RAID components. A RAID controller should support the most important RAID Levels (0, 1, 4, 5 and 10), and should be capable of simultaneously handling multiple arrays with different RAID levels across multiple channels.
RAID Levels - How the drives are organized
Each level of RAID spreads the data across the drives of the array in a different way and is optimized for specific situations. For our purposes, we are going to concentrate on the most common RAID levels used today.
How to determine your RAID level
RAID 0
This RAID level combines two or more hard drives in a way that the data (ABCD...in the yellow pots) coming from the user is cut into manageable blocks. These blocks are striped across the different drives of the RAID 0 array. By doing this, two or more hard drives are combined and the read/write performance, especially for sequential access, can be improved. However, no redundancy information is stored in a RAID 0 array, which means that if one hard drive fails, all data is lost. This lack of redundancy is also stated in the number 0, which indicates no redundancy. RAID 0 is thus usually not used in servers where security is a concern.
Advantage: Highest transfer rates
Disadvantage: No redundancy, i.e. if one disk fails all data will be lost
Application: Typically used in workstations for temporary data and high I/O rate
RAID 1
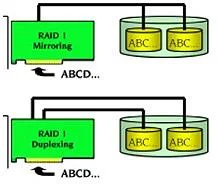
In a RAID 1 system, identical data is stored on two hard disks (100 percent redundancy). When one disk drive fails, all data is immediately available on the other without any impact on the performance or data integrity. We refer to "Disk Mirroring" when two disk drives are mirrored on one SCSI channel. If each disk drive is connected to a separate SCSI channel, we refer to this as "Disk Duplexing" (additional security). RAID 1 represents an easy and highly efficient solution for data security and system availability.
Advantage: High availability, one disk may fail, but the Logical Drive with the data is still available
Disadvantage: Requires 2 disks but only uses storage of one
Application: Typically used for smaller systems where capacity of 1 disk is sufficient and for boot disks
RAID 4
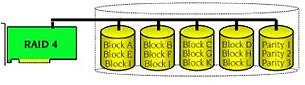
RAID 4 is very similar to RAID 0. The data is striped across the disk drives. Additionally, the RAID controller also calculates redundancy (parity information) which is stored on a separate disk drive (P1, P2, ...). Even when one disk drive fails, all data is still fully available. The missing data is accessed by calculating it from the data that remains available and from the parity information. Unlike RAID 1, only the capacity of one disk drive is needed for the redundancy. If we consider, for example, a RAID 4 disk array with 5 disk drives, 80 percent of the installed disk drive capacity is available as user capacity, only 20 percent is used for redundancy. In situations with many small data blocks, the parity disk drive becomes a throughput bottleneck. With large data blocks, RAID 4 shows significantly improved performance.
Advantage: High availability, one disk may fail, but the Logical Drive with the data is still available
Advantage: Has a very good use of disk capacity (array of n disks, n-1 is used for data storage)
Disadvantage: Has to calculate redundancy information, which limits write performance
Application: Typically used for larger systems for data storage due to efficient ratio of installed capacity to actual available capacity
RAID 5
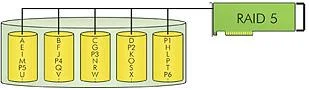
Unlike RAID 4, the parity data in a RAID 5 disk array are striped across all disk drives. The RAID 5 disk array delivers a more balanced throughput. Even with small data blocks, which are very common in multitasking and multi-user environments, the response time is very good. RAID 5 offers the same level of security as in RAID 4: when one disk drive fails, all data is still fully available. The missing data is recalculated from the data that remains available and from the parity information.
Advantage: High availability, one disk may fail, but the Logical Drive with the data is still available
Advantage: Has a very good use of disk capacity (array of n disks, n-1 is used for data storage)
Disadvantage: Has to calculate redundancy information, which limits write performance
Application: Typically used for larger systems for data storage due to efficient ratio of installed capacity to actual available capacity
RAID 6
RAID 6 is like RAID 5, but the parity data are written to two drives. That means it requires at least 4 drives and can withstand 2 drives dying simultaneously. The chances that two drives break down at exactly the same moment are of course very small. However, if a drive in a RAID 5 systems dies and is replaced by a new drive, it takes hours or even more than a day to rebuild the swapped drive. If another drive dies during that time, you still lose all of your data. With RAID 6, the RAID array will even survive that second failure.
Advantages:Like with RAID 5, read data transactions are very fast.If two drives fail, you still have access to all data, even while the failed drives are being replaced. So RAID 6 is more secure than RAID 5.
Disadvantages:Write data transactions are slower than RAID 5 due to the additional parity data that must be calculated. In one report I read the write performance was 20% lower. Drive failures have an effect on throughput, although this is still acceptable.
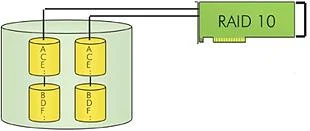
RAID 10
RAID 10 is a combination of RAID 0 (Performance) and RAID 1 (Data Security). Unlike RAID 4 and RAID 5, there is no need to calculate parity information. RAID 10 disk arrays offer good performance and data security. Similar to RAID 0, optimum performance is achieved in highly sequential load situations. Like RAID 1, 50 percent of the installed capacity is lost for redundancy.
Advantage: High availability, one disk may fail, but the Logical Drive with the data is still available
Advantage: Has good write performance
Disadvantage: Requires an even number of disks minimum 4, only half of the disk capacity is used
Application: Typically used for situations where high sequential write performance is requiredd


 2.
2.